TourPak Mount Repair

So, if it will be of any help to you baggers out there, heres a warning to keep an eye on the frame under the pak, and my cheap-ass way of correcting it temporarily. I had a few short rides scheduled for the next few days and didn't have time to buy a new frame and take all the crap off the bike I needed to to get to the mounting bolts thathold it on. Besides this was a Sunday and I had not much to do all day, so I commenced to rigging up a patch that you might be interested in seeing.
  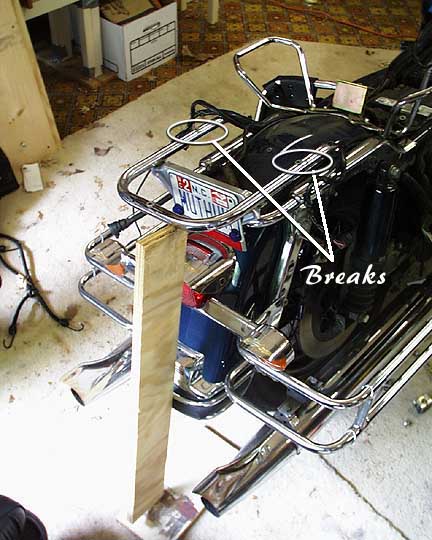  |
Picture #01 and 02 show the tourpak removed with the damage apparent to the chromed tubes that it sits on over the back fender. The whole pack is bolted to this U-shaped tube in three spots, and the tube itself is mounted to the frame in four spots, either side of the fender frame and two small bolts above the license plate. It was these small bolts that held the tourpak in place when I spotted it.
First thing I did was prop the floppy rear part of the tube back in place so it mated up where it belonged (pic #03). The break occurred right at the bolt anchor point on either side of the tube. With the chromed tube back in position, I rummaged through the junk box - we all have a few of those, right? - and found a 1" aluminum L-Brace and cut two pieces to fit as a splint Pic #04).
    |
Using a center punch (Pic #05) and drill (Pic #06) I drilled holes slightly smaller than the self-tapping machine screws I had in the tubing, and matched up holes in the L-Brace (Pic#07) and positioned it in place, screwing through both sides of the tube in two places on each side of the crack (Pic #08)
    |
Pic #9, 10 and 11 show the finished splint in place, followed by #12 with the obligatory black duct tape firmly in place....hey, no repair is complete without either baling wire or duct tape in place - it's in the Owners Manual, ain't it? I'm sure it's in there someplace!
With the seat back in place, side bags clipped in, suspension air pressure boosted up a tad and tourpak bolted back on, I made the evening sunset ride with plenty of time to spare. I'll keep an eye on it for a bit to see if a more permanent fix is needed....but with Kim leaning on it and my propensity for loading up to kill a bear - I think I'll have it done right soon.....
-Muthuh